Hand-tying a quilt is both a traditional and creative finishing technique that serves several purposes and appeals to quilters for various reasons. It is a versatile technique that appeals to a wide range of quilters, from beginners to experienced, allowing them to create beautiful, functional quilts.
Hand-tying a quilt is a very straightforward and an accessible quilting technique that requires minimal materials, which again, is why so many choose this technique.
To get started, you’ll need the following basic materials:
- A Completed Quilt Top: This is the quilt’s decorative top layer, often made up of fabric pieces sewn together in a specific design or pattern.
- Batting: Batting is the middle layer of the quilt, providing warmth and thickness. It is typically made from materials like cotton, polyester, wool, or blends.
- Fabric for the Quilt Backing: The backing fabric is the bottom layer of the quilt. It complements the quilt’s design and should be large enough to cover the entire quilt top and batting.
- Tying Material: The tying material is what you’ll use to create knots that secure the quilt’s layers together. Some of the most common materials include:
- Embroidery Floss: A versatile, inexpensive, and colorful option that is available in various thread thicknesses from one strand to six strands. Most commonly all six strands are used for tying for added strength of the ties.
- Yarn: Using a 4-ply yarn which provides a thicker, more textured look and feel. This can be done with one or two strands.
- Pearl Cotton: Is a soft, durable thread and you would want an 8 or 12 ounce weight. Use a single or double thread, depending upon your desired results.
- Ribbon: Can add a decorative touch to the quilt.
- Crochet Thread: A strong and fine thread choice.
- Narrow Strips of Fabric: Some quilters use thin fabric strips instead of thread for a rustic or scrappy look.
- Scissor: Sharp fabric scissors are essential for cutting both the tying material and trimming excess.
- Large-Eye Needle: A needle with a large eye and sharp tip makes threading the tying material easier, especially when using thicker materials like yarn.
- Basting Items: Depending on your basting method, you may need safety pins, a needle and thread for long basting stiches, or basting spray. Safety pins and basting stitches are used to temporarily hold the quilt layers together, while basting spray is an adhesive that can be applied to secure all of the layers together and will wash away.
These are the basic materials you’ll need for hand-tying a quilt. You can personalize your quilt further by selecting specific tying materials that match your design preferences, and you may also consider adding decorative elements like beads or buttons if desired. Ultimately, hand-tying allows for creativity and customization, making it a versatile and enjoyable quilting technique.
Now that you have your basic materials for tying a quilt, let’s get to the step-by-step process of hand-tying a quilt.
- Prepare the Quilt Sandwich: The foundation of any quilting project is the quilt sandwich, which consists of three layers: the quilt top, the batting, and the quilt backing fabric. Proper preparation is crucial to ensure a smooth and successful hand-tying process. Start by laying your quilt backing fabric wrong side up on a clean, flat surface. Next, place the batting on top of the backing fabric, making sure it lies flat and is free of wrinkles or folds. Then, place your quilt top right side up on top of the batting, aligning all edges. Be sure to take your time to ensure the layers are perfectly aligned, as this will impact the final appearance of your quilt.
- Baste the Layers Together: It is essential to baste these layers together as this will prevent shifting and bunching of layers while hand-tying the quilt together. There are three common methods for basting.
- Safety Pins: Starting in the center and working out, use safety pins to secure the sandwich layers together at regular intervals, usually every 4-6 inches. This ensures that the layers remain in place while tying the quilt together.
- Needle and Thread: Secure the sandwich layers together with long running stitches. Again, starting in the center and working towards the sides make long running stitches that are spaced about 4-6 inches apart.
- Basting Spray: Spray a thin, even layer on the back side of the backing fabric then place the batting on top. Smooth out and wrinkles and press the layers together ensuring they are adhered together. Then, spray the back side of the quilt top and place it carefully on top of the batting. Again, smoothing out the wrinkles and pressing to ensure the layers are adhered together. This method eliminates the need for pins and basting with a needle and thread but requires careful handling to avoid wrinkles.
- Choose the Correct Spacing for the Ties: Before you begin tying your quilt, decide on the spacing between each tie. This impacts the overall look and texture of you quilt. The most common range for tying is 4-6 inches, but you can adjust this to suit your preference and the design you are going for with the quilt. Closer spacing creates a denser texture, while a wider spacing results in a more open and airy feel. So, consider the style and purpose of your quilt when making this decision. Quilts that are intended for warmth with benefit from a closer spacing, while more decorative quilts allow for a wider spacing of the ties.
- Cut the Tying Material: Once your spacing is determined, cut lengths of your chosen tying material. Typically, the length ranges from 12-18 inches but you can adjust this based on your preferences and what is comfortable for you.
- Thread Your Needle: Thread one end of the tying material through the large eye of the needle. Leave a small tail, about 2-3 inches, to secure the material when you tie your first knot.
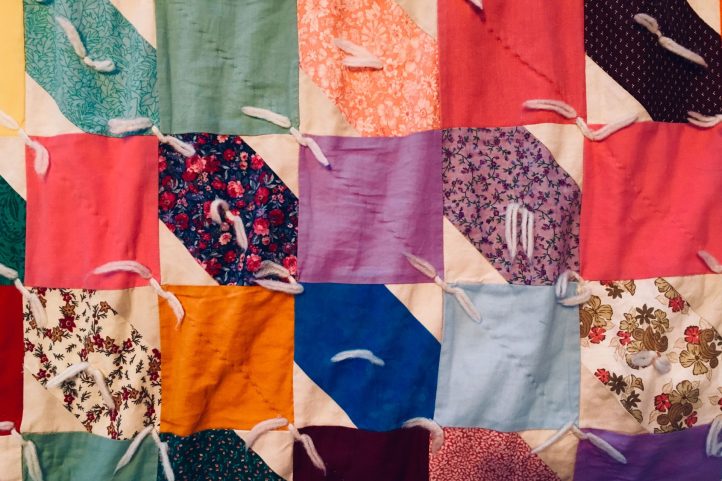
- Tying: Begin at one corner or edge of the quilt. Push the needle down through all of the layers from the top of the quilt leaving a 2-3 inch tail on the top of the quilt. Then, push the needle back up to the front of the quilt about 1/4 – 1/2 inches away. Snip off the long length of the tying material, leaving another 2-3 inches. Tie a double knot with the two ends of the tying material; this will secure it in place.
- Trim the Excess Material: After tying the knot, trim the excess, leaving a small tail approximately 1/2 – 1 inch to ensure a clean and polished finish. Neat trimming enhances the overall appearance of your quilt.
- Continue Tying: Once the first tie is completed, continue the process at your chosen intervals across the entire quilt. Remember, consistency is key, so maintain the same spacing and tension throughout this process.
- Final Touches: Once all of the ties are complete, remove the safety pins or basting threads, if used. Check your quilt for any loose threads and trim them. Double check to be sure every tie went through all the layers of your quilt, if you missed going all the way through, remove the tie and make a new tie being sure to catch all the layers.
Tips and Tricks when Tying a Quilt
Hand-tying a quilt is not just about following steps; it is actually an art form that allows for creativity and personalization. Here are just a few tips and tricks to remember when tying a quilt.
- Personalize your quilt with your unique style.
- Experiment with different tying patterns and materials.
- Keep all the layers smooth by checking regularly throughout the process.
- Use a thimble as it can protect your fingers from strain and punctures when pushing through all of the layers.
- Use a quilting ruler or templates to help maintain even spacing of the ties to ensure a neat and balanced appearance.
- Check knot tightness to be sure they are snug but not too tight, and adjust the tension if needed.
- Enjoy the Process.
Is a quilt frame required to tie a quilt? I have one that I inherited, have never used it. Could you just lay the quilt sandwich on the floor and tie it successfully? Thanks, loving this magazine!
Hi Elizabeth! While a quilt frame is always helpful, it is not necessary to hand tie a quilt. Have a great day! – Ashley, We Like Sewing
Never thought of finishing a quilt this way. I do not have a long arm machine so its expensive to have to keep on putting my quilts out for finishing. Thank you so much for this tutorial
You’re so welcome, Christine! We’re happy that you enjoyed this article. Have a great day! – Ashley, We Like Sewing